How to Use Conditional Formatting in Excel to Highlight Data
Conditional formatting is a powerful tool in Excel that allows you to apply formatting to cells based on specific conditions or rules.
With conditional formatting, you can quickly highlight important data in your spreadsheet and make it stand out, making it easier to analyze and interpret your data.
Let's explore how to use conditional formatting in Excel to highlight data.
Step 1: Select the data range
The first step in applying conditional formatting is to select the range of cells you want to format.
This can be a single cell, a range of cells, or an entire column or row. To select a range of cells, simply click and drag over the cells you want to format.
Step 2: Open the Conditional Formatting menu
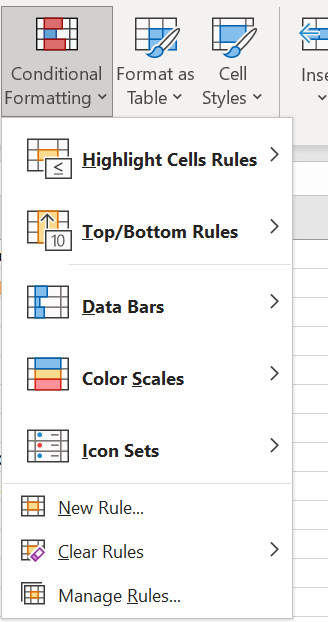
Once you have selected the range of cells you want to format, you can open the Conditional Formatting menu by clicking on the "Conditional Formatting" button in the "Home" tab of the Excel ribbon.
From the dropdown menu, you can select the type of formatting you want to apply, such as color scales, data bars, or icon sets.
Step 3: Choose the formatting rule
After opening the Conditional Formatting menu, you will need to choose the formatting rule you want to apply.
This will depend on the specific conditions you want to use to highlight your data. For example, if you want to highlight cells that contain a certain value, you can choose the "Highlight Cells Rules" option and then select "Equal To" from the submenu. This will open a dialog box where you can enter the value you want to highlight.
Step 4: Set the formatting options
Once you have chosen the formatting rule, you will need to set the formatting options.
This will allow you to specify how you want the highlighted cells to appear. For example, you can choose a specific font color, background color, or border style for the highlighted cells. You can also choose to apply a gradient fill, data bars, or icon sets to the highlighted cells.
Step 5: Preview and apply the formatting
After setting the formatting options, you can preview the formatting right in the selected range of cells.
This will show you how the formatting will look on your selected data range. If you are happy with the formatting, you can apply it by clicking the "OK" button.
Additional Tips and Tricks
Here are a few additional tips and tricks to help you get the most out of conditional formatting in Excel.
Use multiple rules
You can apply multiple formatting rules to the same data range, allowing you to highlight different types of data in different ways.
Use formula-based rules
Instead of using one of the preset rules in the Conditional Formatting menu, you can create your own custom formatting rules based on formulas. This gives you more flexibility and control over how your data is highlighted.
Use color scales
Color scales allow you to highlight data based on its relative value within a range. For example, you can use a green-yellow-red color scale to highlight high, medium, and low values within a range.
Use data bars
Data bars are a visual representation of your data that allows you to quickly see the relative values of each cell. You can choose from different styles and colors to customize your data bars.
Use icon sets
Icon sets are a set of predefined icons that you can use to highlight data based on specific conditions. For example, you can use a set of red, yellow, and green arrows to indicate whether a value is above, below, or at the expected value.
Conditional formatting is a powerful tool that can help you highlight important data in your Excel spreadsheet. By following these five steps and using these additional tips and tricks, you can make your data easier to analyze and interpret, and ultimately make better decisions based on your data.
( Data samples : https://www.contextures.com/xlsampledata01.html )


Comments
Post a Comment